Introduction
Sasuke Uchiha is undoubtedly one of the most popular characters from the Naruto series, and for good reason. He’s complex, intriguing, and has an iconic appearance that fans of the series love to draw. Whether you’re a seasoned artist or just starting out, drawing Sasuke can be a challenge. But fear not! In this article, we’ll take you through a step-by-step guide to drawing Sasuke, with all the tips and tricks you need to capture his unique look.
Step-by-Step Guide
First things first, let’s break down the drawing process into manageable steps. We’ll start with basic shapes and gradually add detail, shading, and finishing touches. Here’s an overview of what we’ll cover:
- Drawing the head
- Drawing the eyes
- Drawing the nose and mouth
- Drawing the hair
- Drawing the clothing
- Drawing the weapons
While this may seem like a lot, we’ll take it step by step and provide plenty of illustrations to help you along the way!
Video Tutorial
We understand that some people may prefer to learn by watching rather than reading. That’s why we’ve also included a video tutorial that walks you through the steps to draw Sasuke. This is a great resource for seeing each step in action and getting a sense of the overall process. You can find the video here. Below is a summary of the main steps covered:
- Sketch out the basic shapes
- Add detail to the head and face
- Draw the clothing
- Add shading and highlights
- Finish with any additional details (like weapons or accessories)
Infographic
For those who prefer to learn visually, we’ve also included an infographic that summarizes the steps to draw Sasuke. This is a great resource to print out and keep on hand while you’re drawing. Here’s an overview of what the infographic covers:
- Sketch out basic shapes for the head, torso, and limbs
- Add detail to the head and face
- Draw the hair and clothing
- Add shading and highlights
- Finish with any additional details (like weapons or accessories)
While these steps may seem basic, the infographic includes additional tips and reminders to make the drawing process easier. We highly recommend checking it out!
Tips and Tricks
Even experienced artists can benefit from learning new techniques, so in this section we’ll provide a list of common tips and tricks for drawing Sasuke. Here are some of the main ideas we’ll cover:
- Use reference images to get a sense of Sasuke’s unique features
- Pay attention to the details, like the shape of the eyes and the texture of the clothing
- Experiment with different shading techniques to add dimension to the drawing
- Don’t be afraid to use bold lines and shapes to capture Sasuke’s distinctive style
- Practice, practice, practice!
Throughout this section, we’ll include illustrations to demonstrate each technique and to provide examples of successful Sasuke drawings.
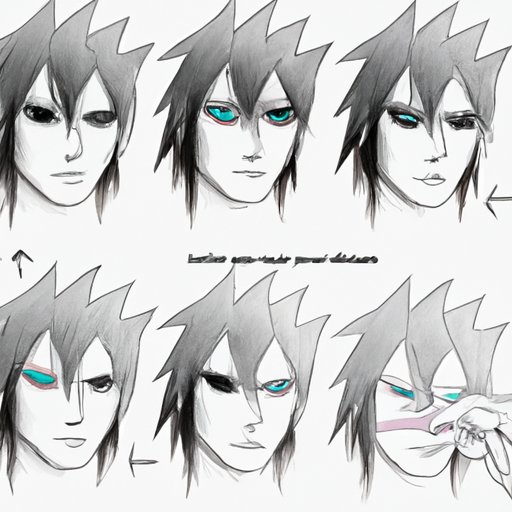
Highlight Different Stages
Over the course of the Naruto series (and beyond), Sasuke has had multiple designs. In this section, we’ll break down the different stages of his appearance, including his original design and his appearance in Shippuden. We’ll use side-by-side illustrations to show the differences between each stage and to provide tips for capturing each design.
Interactive Tutorial
It’s one thing to read about how to draw Sasuke, but it’s another thing entirely to put those skills to the test. That’s why we’ve also included an interactive tutorial that allows readers to practice their new drawing skills. The tutorial provides step-by-step instructions and offers tips for success along the way. We encourage readers to try it out and share their drawings on social media or in the comments section!
Conclusion
By now, you should have all the tools you need to draw Sasuke Uchiha. From step-by-step instructions to video tutorials and illustrations, we’ve covered all the bases. Remember to take it one step at a time, and don’t be afraid to make mistakes. The more you practice, the better you’ll get.


