Introduction
The purpose of this article is to provide readers with a guide on how to fold heart-shaped paper. This skill can be particularly useful for those who enjoy making DIY cards or gifts. A handmade card with a personalized heart-shaped note can make an extra thoughtful gift. In this tutorial, we will discuss the importance of learning this skill and its practical applications.
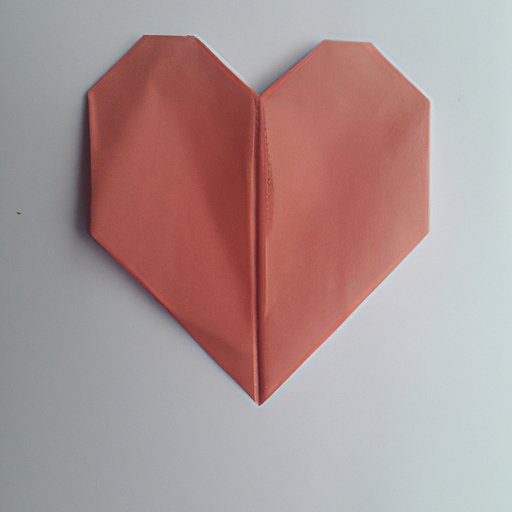
The Ultimate Guide to Folding Heart-Shaped Paper in 5 Easy Steps
The following are the five easy steps involved in folding a heart-shaped paper:
- Start with a square piece of paper.
- Fold the paper in half diagonally, and then re-open it.
- Press the left and right corners towards the center crease line.
- Turn the paper over, and fold it down at the center crease line.
- Finally, fold the top of the paper down so that it overlaps the bottom by about half an inch.
Once you have completed these simple steps, you will have your very own heart-shaped paper!
Origami 101: How to Fold a Heart-Shaped Note for Your Loved One
Folding a heart-shaped note can be a sweet and romantic gesture for that special someone in your life. Here’s how to do it:
- Begin with a square piece of paper.
- Fold the paper in half diagonally and unfold it.
- Next, fold the right and left corners inwards, towards the middle crease line.
- Flip the paper over and fold the top edge down, forming a triangular shape at the top.
- To create the heart’s rounded bottom, fold the two bottom corners upwards, towards the center crease line.
- Finally, fold the top of the paper down to create the middle crease line and your heart-shaped note is complete.
You can also add your personal touch to the heart-shaped note by writing something special or drawing a picture on it!
Fold Your Love Into a Paper Heart: A Step-by-Step Tutorial
If you want to try another method of folding a heart-shaped paper with variations in the final outcome, here’s how:
- Begin with a rectangular piece of paper. Fold it in half widthwise and crease the fold.
- Next, fold down the top corners to meet at the center crease line.
- Flip the paper over and fold the top edge down to create a triangle.
- Now, fold the triangle up to the top, leaving a small piece of the triangle visible at the bottom.
- Fold the left and right sides of the paper inwards to create the heart’s curves. These folds should start from the first crease and extend to the top of the triangle.
- Finally, fold the bottom point of the triangle upward to meet the top of the heart, and voila! Your heart-shaped paper is ready.
Feel free to experiment with the shape of your paper heart by adjusting the angle of the folds.
The Art of Paper Folding: DIY Heart-Shaped Cards for Any Occasion
Now that you’ve mastered the heart-shaped paper-making technique, it’s time to take it to the next level by incorporating it into your card-making designs. Here are some creative ways to incorporate the folded heart:
- Stick a 3D heart in the center of your card for a simple but elegant design.
- Repeat the heart shape in a pattern to create a unique background or border.
- Use folding techniques to create multiple hearts and place them under one another for a cascading effect.
- Incorporate the hearts into a pop-up project for a truly stunning card surprise.
Get Creative with Paper: Try These 5 Heart-Folding Techniques
If you want to take your paper-folding skills to the next level, here are five additional heart-folding techniques that are sure to impress:
- Double Heart: Fold a single heart and repeat the same process on another piece of paper, making sure to align the curves. Connect the two hearts together to create a unique double-heart design.
- Dancing Heart: Fold a heart in half diagonally and cut along the crease to create two identical halves. Fold them back together at the crease to create a dancing heart design.
- Heart Basket: Fold a rectangular piece of paper in half diagonally and repeat the process in the opposite direction. Fold each corner towards the center crease line, creating four triangles. Fold the bottom edge up and over the triangles to create a basket. Finally, create a heart shape out of another piece of paper and glue it onto the basket.
- Heart Bookmark: Fold a rectangular piece of paper in half horizontally and vertically. Fold the top edges down to meet the center crease line. Fold the bottom corners inwards towards the center crease line, then fold the paper in half horizontally. Finally, tuck it into a book to use as a bookmark.
- Heart Envelope: Fold a square piece of paper in half diagonally and repeat the process in the opposite direction, then fold each corner towards the center crease line. Fold the side edges inwards to create the envelope’s closing flap, and you have your envelope!
Conclusion
Folding a heart-shaped paper can be an enjoyable and worthwhile skill to learn. As we’ve demonstrated in this article, it is relatively easy and can be customized to suit various occasions. Whether you want to create a unique card for Valentine’s Day or simply want to improve your paper-folding skills, the heart-shaped method is a fun and versatile technique to have in your repertoire.
So, go ahead and try folding your own heart-shaped paper today.


